Cherry Cookie Cups are sweet, soft, and incredibly easy to make. They look like a bakery-style dessert, but they come together with simple shortcut ingredients: refrigerated sugar cookie dough, cherry pie filling, and a pretty drizzle of icing.
Each bite has a soft sugar cookie base, a glossy cherry center, and a sweet vanilla-style finish on top. They are perfect for holidays, parties, bake sales, dessert trays, or any time you want a quick treat that feels special without a lot of work.
Why You’ll Love This Recipe
These cookie cups are simple, cute, and full of sweet cherry flavor. The sugar cookie dough bakes into little edible cups, while the cherry pie filling adds a soft, fruity center. The icing drizzle makes them look festive and adds just the right finishing touch.
They are also easy to customize with powdered sugar, vanilla glaze, almond flavor, or even a little whipped cream before serving.
Recipe Details
- Prep Time: 15 minutes
- Cook Time: 10 to 13 minutes
- Cooling Time: 15 minutes
- Total Time: About 40 minutes
- Servings: About 24 mini cookie cups
Ingredients
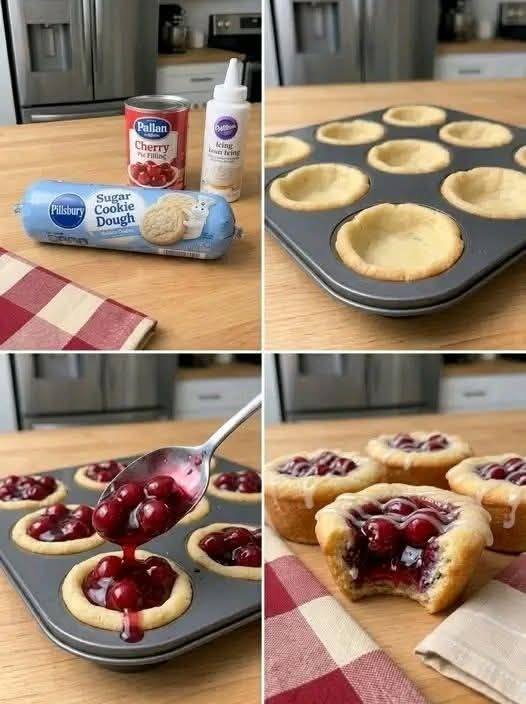
- 1 roll refrigerated sugar cookie dough
- 1 can cherry pie filling
- Cookie icing or vanilla glaze, for drizzling
Optional Add-Ins
- Powdered sugar, for dusting
- A few drops of vanilla extract added to the icing
- A tiny drop of almond extract for a cherry-almond flavor
Instructions
Step 1: Prepare the Pan
Preheat your oven to 350°F. Lightly grease a mini muffin tin so the cookie cups release easily after baking.
Step 2: Portion the Cookie Dough
Cut the refrigerated sugar cookie dough into small equal pieces, about 1 tablespoon each. Roll each piece into a ball.
Place one dough ball into each cavity of the mini muffin pan.
Step 3: Shape the Cookie Cups
Use your thumb or the back of a small spoon to gently press the center of each dough ball, creating a cup shape.
Do not press the dough too thin. The bottom and sides need to be thick enough to hold the cherry filling.
Step 4: Bake
Bake for 10 to 13 minutes, or until the edges are lightly golden.
If the centers puff up while baking, gently press them down again right after removing the pan from the oven. Use the back of a spoon to reshape the cups while they are still warm.
Let the cookie cups cool in the pan for 5 to 10 minutes, then carefully transfer them to a wire rack.
Step 5: Add the Cherry Filling
Once the cookie cups are completely cooled, spoon cherry pie filling into the center of each one.
Try to place 1 to 2 cherries in each cup, along with a little of the glossy filling.
Step 6: Drizzle with Icing
Drizzle cookie icing or vanilla glaze over the tops in thin lines. Let the icing set for 10 to 15 minutes before serving.
Why This Recipe Works
Sugar cookie dough bakes beautifully in a mini muffin pan because the edges set into a soft but sturdy shell. Pressing the dough into the pan creates a small edible cup that can hold the cherry filling.
The cherry pie filling adds moisture, color, and fruity flavor, while the icing drizzle gives each cookie cup a finished dessert-tray look.
Tips for the Best Cherry Cookie Cups
Make sure the cookie cups are fully cooled before adding the filling. If they are still warm, the cherry filling can become runny.
Grease the mini muffin pan well to prevent sticking.
If the cookie centers puff too much, press them down immediately after baking while the dough is still soft.
For a prettier finish, use a small spoon to place the cherries neatly in the center of each cup.
A tiny amount of almond extract pairs beautifully with cherry, but use it sparingly because the flavor is strong.
Easy Variations
Cherry Almond Cookie Cups
Add a tiny drop of almond extract to the icing before drizzling. This gives the cookie cups a soft cherry-almond bakery flavor.
Chocolate Cherry Cookie Cups
Drizzle melted chocolate over the tops instead of vanilla icing.
Cheesecake Cherry Cookie Cups
Add a small spoonful of sweetened cream cheese filling before topping with cherry pie filling.
Mixed Fruit Cookie Cups
Use blueberry, apple, peach, or strawberry pie filling instead of cherry for a different flavor.
Storage
Store Cherry Cookie Cups in an airtight container in the refrigerator for up to 3 days.
For the best texture, let them sit at room temperature for about 10 minutes before serving. This helps the cookie base soften slightly.
Can I Make These Ahead of Time?
Yes. You can bake the cookie cups one day ahead and store them unfilled in an airtight container. Add the cherry filling and icing closer to serving time for the freshest look and texture.
Final Thoughts
Cherry Cookie Cups are simple, pretty, and full of sweet fruit flavor. With soft sugar cookie cups, glossy cherry filling, and a sweet icing drizzle, they make an easy dessert that looks festive with very little effort.
They are proof that a few shortcut ingredients can still create something delicious, charming, and perfect for sharing.